Product photography is vital for showcasing products in the best light. Indeed, high-quality images can significantly influence customer purchasing decisions, and even minor errors can degrade your photos' quality and lower sales. Awareness of common mistakes and how not to fall into those traps ensures that the product shots are professional and pop out. Here are some common errors taken while taking photos of products and some recommendations on how to avoid them.
Essential Tips to Avoid Common Product Photography Mistakes
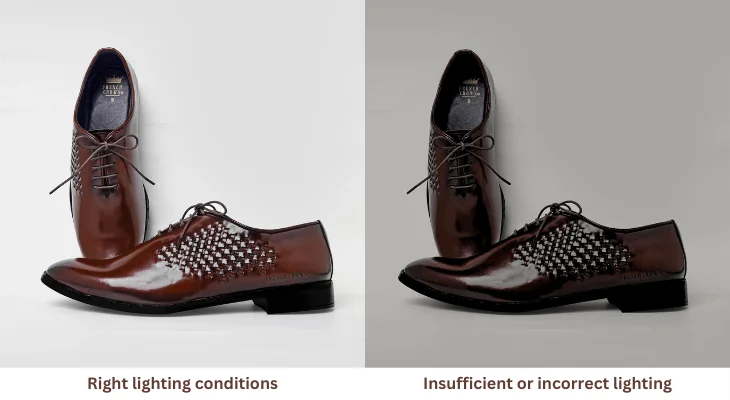
Poor Lighting
Error : An overly bright or dark shadowy image just can't seem to capture your products as it is caused by insufficient or incorrect lighting.
Solution : Good Gear: Be sure to have the right lighting equipment or at least know how to work with what light you have. Use reflectors, softboxes, or diffusers to even out lighting and soften any hard shadows.

Constant Light Source: Once the right lighting conditions are set up, the light source should also be constant to produce excellent photographs. Adjust your lighting to find the optimal ratio between shadows and highlights, making the scene look natural and engaging.
Cluttered Background
Error : The background is cluttered or has something distracting from the product.
Solution : Clean and Simple Backgrounds: This will allow focusing on the products. Go for clean, simple backgrounds with neutral or white-coloured backgrounds for maximum effects.

Clean Backgrounds in Lifestyle Shots: Ensure the background is limited or enhanced without dominating the object of interest in lifestyle shots. It will guarantee that the product stays at the centre of the image
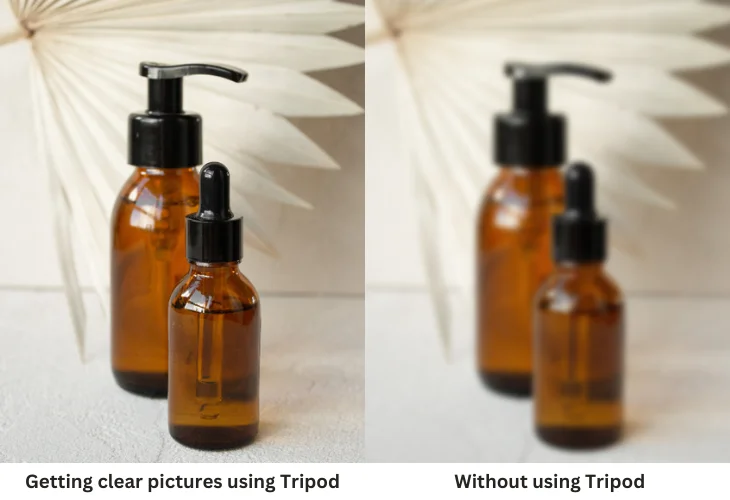
Wrong Focus
Error : Photos with soft or blurry focus will not show a pleasing product image and will make it look tacky.
Solution : Use a Tripod : Getting clear pictures is aided by using a tripod, which keeps your camera steady to provide crisp images.

Manual Focus: If possible, use the camera to determine the exact focal point of the item and click. The focus must be proper before clicking. Always check the focus before clicking the picture to see if it's sharp.
Not showing product specification
Error : After going through the pictures, several probable customers remain in a dilemma about the main features of the products and hence become sceptical of the quality and features of the purchase.
Solution : Close-Up Shots : Close pictures should portray details like textures and patterns, among other peculiar features that identify the object.
Multiple Viewpoints : Multiple viewpoints can be effective for any single product to provide all information about it. It aids potential buyers in understanding a product well and making a wise decision while buying it.
Inconsistent Images
Error : Different lighting, change in perspective, or change in the background results in unpredictable images, making product shots cluttered and less professional.
Solution : Standardize Your Setup : Clean up and take standard photos of each product. Use consistent lighting, background, and camera angle to set a standardized brand image for all products.
Lighting and Angles Consistency : Every single product should be treated exactly with the same lighting, background, and position of the camera to create a unified brand image.
Over Editing
Error : The over-editing has become unbelievable over time. It looks removed from reality.
Solution : Fine Tuning: Make minor adjustments to the picture. It is best when the actual colours and features of the item are expressed well, but some brightness, contrast, and sharpness can be changed. Too many filters and effects should not be used.
Natural Look: Pay attention to the fact that it looks natural and corresponds to the real-life appearance of the product. This creates trust among buyers and avoids misunderstandings when delivering the received product.
Shadows Can Be Ignored
Error : If too few shadows make an image lifeless, too many kill an object.
Solution : Balanced Shadows: An image with fewer shadows but flatter and spreading out the light more equally looks more harmonious and natural. Use diffused light to decrease the contrasts of shadows for a more harmonious, natural look.
Controlled Shadows: Experiment with different light angles until you achieve a shadow impact that adds dimension to the shot without dominating it. Ensure the shadows fall to enhance the product's features and do not dishonour them.
Glare and Reflections
Error : Glare and reflection are normal in shiny products; sometimes, they cover valuable details.
Solution : Light adjustment: Reduce light to have lesser chances of reflections. Change the position of the light source around to minimize any reflection or glare. Try positioning lights at different angles to find the best arrangement to make your product stand out the most without these unwanted reflections.
Polarizing Filters: A polarizing filter on the camera lens will avoid glare. A polarizing filter can be fitted on a highly reflective camera lens to eliminate glaze and reduce reflections.
Failure to Consider White Balance
Error : The tints of the product are not true to its colour due to an incorrect white balance.
Solution : Correct White Balance : Balance the white balance with the available lighting. Use a grey card to help you to get close to the accurate colour.
Post-Processing Adjustments : When needed, make the white-balance adjustments in post-processing, and your colours will be more accurate.
Poor Planning
Error : One of the most common mistakes is taking the picture spontaneously. That will turn out less than expected since there won't be as much information as there should be, and it will show in the quality of the photos.
Solution : Plan in advance: Plan ahead of time—get all your equipment in order and clean. Make sure everything is ready for the shot.
Test Shots: Take test shots that will help you in tweaking the settings. This kind of preparation lets you be sure that you have thought everything about the shoot and have various incredible images.
Pro Tips to Avoid Common Mistakes in Product Photography
Avoiding these common mistakes will help you develop much better product photography. You can prepare and execute a little to create photographs that bring out your items' best features and give the visuals a polished look. Keeping away from common mistakes will provide a new elevation to your product images to be more attractive to buyers and drive sales. Take a moment to view some of the fine work Pavithra Photography, Coimbatore's leading product photographer has executed. Their expertise in capturing stunning product photos is an excellent reference for bettering your photography skills.


